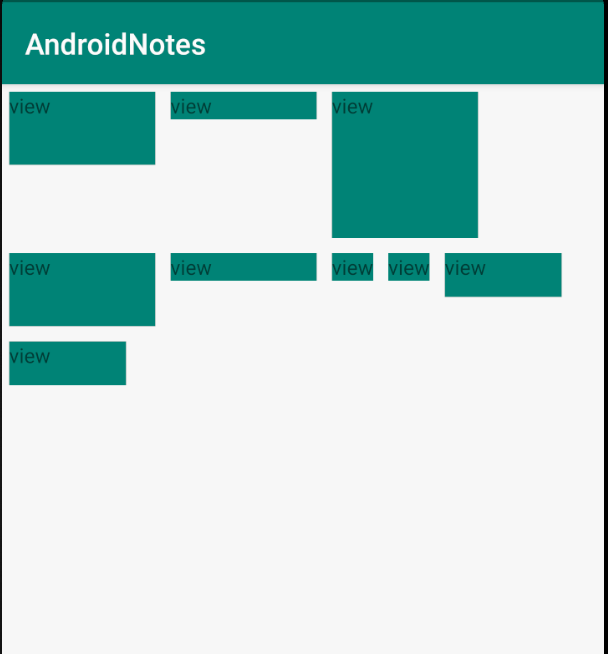
在 web 开发中用的,网页布局有个流式布局的概念,自动换行,并且可以自适应,使用起来很方便。但是一开始 Android 系统中是没有这种布局的,之所以说一开始是因为后来谷歌出了个库实现了这个功能,它就是 FlexboxLayout。这个库功能比较强大,支持多种布局方式,并且还有 FlexboxLayoutManager 可以搭配 RecyclerView 使用。
但是我们今天说的并不是它,而是怎么自定义一个流式布局,通过这个自定义布局来复习和实战一下《Android 开发艺术探索》一书中的第四章的内容。另外说明下,本文代码使用 Kotlin 编写。
首先分析下流式布局的特点:
既然我们把它定位为布局,那么肯定是要自定义 ViewGroup,这里选择了直接继承 ViewGroup 来实现。我们看源码会知道 ViewGroup 是个抽象类,他的子类必须实现 onLayout() 方法来处理布局,当然还得自己处理测量,同时还要处理子元素的测量和布局。
测量尺寸 自定义 View 需要测量,布局,绘制三个流程。我个人感觉最复杂是测量这一过程。想理解测量就必须先理解 MeasureSpec,关于 MeasureSpec 这里需要说一下。
MeasureSpec MeasureSpec 直译就是测量规格,它参与了 View 的绘制过程。
UNSOECIFIED
EXACTLY
AT_MOST
因此,我们知道 MeasureSpec 就能知道 SpecMode 和 SpecSize 了,然后我们可以根据这两个值去处理 View 的大小。
自定义 View 只要考虑 MeasureSpec.EXACTLY 和 MeasureSpec.AT_MOST 即可。
好了,了解了 MeasureSpec,我们继续说测量的事,分析下流失布局的特点,我们先看一下 FlexboxLayout 在 app:flexWrap="wrap"模式下的显示情况,然后我们来实现这种效果,(布局中每个View 的 margin=5dp)
根据上图分析下测量的实现思路:
首先测量就是测 View 尺寸,需要确定 View 的宽高。
根据布局的特点,测量最小的宽高尺寸,并且这个数值不能大于 parent 给出的建议 size。
对于宽度,子 View 有多行,每行长度不一致,最长的那一行就是 View 的宽度。
对于高度,子 View 的高度不一致,每一行的最大高度的和就是 View 的高度。
要考虑Layout自身的 pading 和子 view 的 margin。
相关代码:
1
2
3
4
5
6
7
8
9
10
11
12
13
14
15
16
17
18
19
20
21
22
23
24
25
26
27
28
29
30
31
32
33
34
35
36
37
38
39
40
41
42
43
44
45
46
47
48
49
50
51
52
53
54
55
56
57
58
59
60
61
62
63
64
65
66
67
68
override fun onMeasure(widthMeasureSpec: Int, heightMeasureSpec: Int) { Log.d(TAG, "onMeasure") val widthSpecMode = MeasureSpec.getMode(widthMeasureSpec) val widthSpecSize = MeasureSpec.getSize(widthMeasureSpec) val heightSpecMode = MeasureSpec.getMode(heightMeasureSpec) val heightSpecSize = MeasureSpec.getSize(heightMeasureSpec) val childCount = childCount // 测量子 View 尺寸 measureChildren(widthMeasureSpec, heightMeasureSpec) var lineWidth = 0 var lineHeight = 0 var maxWidthSize = 0 var height = 0 for (i in 0 until childCount) { val child = getChildAt(i) if (child.visibility == View.GONE) { // 处理最后一个 View 出现的情况,上面 maxWidthSize 和 height只处理到了倒数第二行 if (i == childCount - 1) { maxWidthSize = max(lineWidth, maxWidthSize) height += lineHeight } continue } val childParams = child.layoutParams as MarginLayoutParams // 子 View 的宽高包含他们的 margin val childWidth = child.measuredWidth + childParams.leftMargin + childParams.rightMargin val childHeight = child.measuredHeight + childParams.topMargin + childParams.bottomMargin if (lineWidth + childWidth > widthSpecSize - paddingLeft - paddingRight) { // 换行 // 记录最大宽度 maxWidthSize = max(lineWidth, maxWidthSize) // 重置 lineWidth lineWidth = childWidth height += lineHeight lineHeight = childHeight } else { lineWidth += childWidth lineHeight = max(childHeight, lineHeight) } // 处理最后一个 View 出现的情况,上面 maxWidthSize 和 height只处理到了倒数第二行 if (i == childCount - 1) { maxWidthSize = max(lineWidth, maxWidthSize) height += lineHeight } } val resultWidth = if (widthSpecMode == MeasureSpec.EXACTLY) { widthSpecSize } else { min(maxWidthSize + paddingLeft + paddingRight, widthSpecSize) } val resultHeight = if (heightSpecMode == MeasureSpec.EXACTLY) { heightSpecSize } else { min(height + paddingTop + paddingBottom, heightSpecSize) } setMeasuredDimension(resultWidth, resultHeight) }
布局 还是看上图,布局比较简单,就是从左向右排列,如果子 View 的显示超出了 Layout 的最大宽度就换行。所以思路就是依次遍历所有的子 View,然后从左向右依次排列,确定子 View 的位置,每次对子 View 进行 layout 之前,要预算它的显示范围,如果超出了 parent 的宽度,那么它就需要换行。
定位 View 主要是确定 View 的四个顶点的位置。再简化一下,只需要知道左上角顶点的位置加上 View 的宽高就能定位一个 View,而左上角顶点就是 left, top。对于同一行,left 依次向右移动,如果定位的 View 的长度超出了 ViewGroup 最大宽大度就换行,然后更新 left,top,每换一行 top 向下移动。
相关代码:
1
2
3
4
5
6
7
8
9
10
11
12
13
14
15
16
17
18
19
20
21
22
23
24
25
26
27
28
29
30
31
32
33
34
35
36
override fun onLayout(changed: Boolean, l: Int, t: Int, r: Int, b: Int) { Log.d(TAG, "onLayout") var childLeft = paddingLeft var childTop = paddingTop var lineHeight = 0 var childParams: MarginLayoutParams val childCount = childCount for (i in 0 until childCount) { val child = get(i) if (child.visibility == View.GONE) { continue } childParams = child.layoutParams as MarginLayoutParams val childWidth = child.measuredWidth + childParams.leftMargin + childParams.rightMargin val childHeight = child.measuredHeight + childParams.topMargin + childParams.bottomMargin if (childLeft + childWidth > width - paddingRight) { // 换行, 更新 childLeft,childTop,lineHeight childLeft = paddingLeft childTop += lineHeight lineHeight = childHeight } else { lineHeight = max(lineHeight, childHeight) } setChildFrame(child, childLeft + childParams.leftMargin, childTop + childParams.topMargin, child.measuredWidth, child.measuredHeight) childLeft += childWidth } }
到了这里我们的流式布局基本就完成了,但是还有个问题,测量的时候最大宽度是给定的 parentSize,那如果单个 View 的宽度为一个很大的值,超过了这个 parentSize,我们再布局的时候该怎么处理呢?
看了一下 LinearLayout 的情况,是直接将按 View 的宽高来布局的,就是 View 会延伸到屏幕外面,然后看一下 RelativeLayout 则是限制了最大宽度,如果超过 parentSize 则最大为 parentSize
具体情况看下图:
又看了下 FlexboxLayout 也是和 RelativeLayout 一样, 所以怎么处理看自己情况吧。这边给出我自己的处理情况:
1
2
3
4
5
6
7
8
9
10
private fun setChildFrame(child: View, left: Int, top: Int, width: Int, height: Int) { // 可有可无,仿照 FlexboxLayout 做了此操作 val right = if (left + width > getWidth()) { getWidth() - (child.layoutParams as MarginLayoutParams).rightMargin } else { left + width } Log.d(TAG, "left=$left,right=$right,top=$top,bottom=${top + height}") child.layout(left, top, right, top + height) }
绘制 View 绘制相关的方法是 onDraw(), 这个需求中并不需要特殊的绘制,所以可以不用管它。
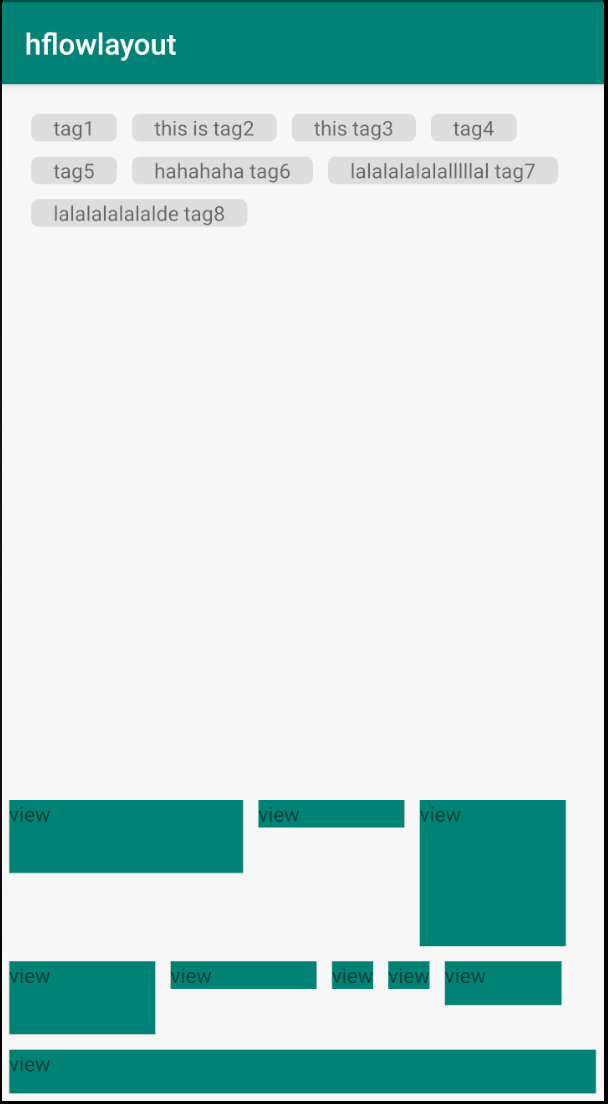
到这里基本上都处理完了,下面看一下效果图,上面是 tag 标签,下面纯 View 组合:
总结 自定义 ViewGroup 的基础是清楚 View 的工作原理以及工作流程。其中工作流程主要是指 measure,layout,draw 三大流程,即测量,布局,绘制,其中 measure 确定 View 的测量宽高,layout 确定 View 的最终宽高和四个顶点的位置,而 draw 则将 View 绘制到屏幕上。只有做到对于每个流程都能了然于心才能在自定义 View 时游刃有余。当有了这些基础之后,实现一个自定义 View 主要放在了功能实现上。另外一个体会就是编码之前重要的是要学会分析需求,考虑到各个方面,这个情况个人觉得跟算法比较像,多做算法题有利于提高自己的逻辑思维能力和分析问题解决问题的能力。又给自己找到一个学习算法的的理由,哈哈哈哈哈哈,加油吧,骚年。。。
更新 重新整理了代码,放在了github:https://github.com/huazidev/HFlowLayout


